Showing posts with label pattern. Show all posts

Sunday, December 11, 2011

Gir Hat Pattern: Putting It All Together

Previous
Getting Started
Hat Base
Earflaps
Eyes
Ears, Tongue and Nose 

You have finished crocheting the Gir Hat Pattern, congratulations!

All that is left is to assemble the hat. 

Zipper Seam.

At the middle of the front of the hat (count in to stitch 12) attach black yarn.  Weave the yarn over and under alternating rows of dc in a straight line up the center of the hat, cross over the peak of the hat (the magic ring/ starting point) and continue down the back of the hat till you reach the boarder of the opposite side.  Do not pull this thread too tightly or is will cause the hat to pucker.  Tie of the yarn and weave the ends into the boarder. 

Front view of zipper seam


Top view of zipper seam

Back view of zipper seam

Attach Nose to Hat Base.

Attach the nose along the black seam in the middle of the front of the hat.  The nose should be centered along the seam with the bottom point lined up with the top of round 16 on the hat base.  Stitch around the boarder of the nose with black yarn so that is blends in.  Tie off the yarn and weave in ends. 
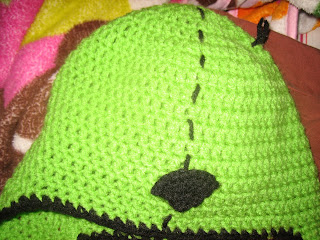
Front view Nose Attached

Attach Tongue to Hat Base.

Place the small end of the tongue (row 10) along the inside of the boarder of the hat base near the corner where it meets the earflap on the front of the hat (the front has a wider distance between the earflaps).  Sew the tongue to the hat with black yarn.  Tie of the yarn at either ends and weave into the boarder. 

Front of hat with tongue

Tongue attached

Attach Ears to Hat Base.

Attach the ears to the hat along the shortest boarder of the ear (row 24).  Position ears on back of hat so that they are located equal distances from the "zipper seam" and appear to be symmetrical.  While they can be placed anywhere you want, I placed mine so that the top of the row 24 was attached between rounds 4 and 5 on the hat base about 6 dc away from the seam.  Then the ear was stitched on at an angle so that the bottom of the ear attachment was located between rows 6 and 7 and over about 8 dc from the mid line seam.  Tie of yarn and weave in ends.  Repeat for second ear. 

Back of hat ear placement

Attach Pupil to Eyeball.

Center the pupil on the eyeball and thread the ends of the left over yarn from the pupil through the spaces between the 1st and 2nd rounds on the eyeball.  Continue to stitch all the way around the pupil till you get back to where you started.  Tie of the yarn and weave in the ends.  Repeat for second eye.

Stitching on pupil, view inside eyeball

Stitching on pupil

Attach Eyes to Hat Base

Stuff eye ball with enough fiberfill that it remains round when poked, but not so much that it is overflowing.  Attach eyes so that they are placed symmetrically on either side of the zipper seam.
I placed the eyeballs so the top of the eyeball was along the bottom of round 5 and the bottom extended down to the top of round 12.  Stitch around the base of the eyeball with white yarn.  Tie off yarn and weave ends into base of eyeball.  Repeat for second eye.

Stitching on 1st eye

Eye placement

Adding the second eye

Both eyes attached

Hoorary!!! Your Gir Hat is FINISHED!!!!


As you can see, I changed the ears a little from the original hat, but everything else is as similar as possible.  I hope you have fun making gir and if you notice any mistakes in the pattern please let me know and I will fix them.  Also, I have compiled all the previous instructions into a single PDF.  I am not entirely sure how to upload it onto blogger, but if you want it I would be happy to e-mail it to you.

Good luck and happy hooking. :)

Saturday, December 10, 2011

Gir Hat Pattern: Ears, Tongue and Nose

Previously
Getting Started
Hat Base
Earflaps
Eyes

Ear: black yarn (make 2) 

Use H Hook  

Row 1: Ch 11

Row 2: sc in 2nd ch from hook and in each ch after (10sc); turn—10sts total


 Rows 3-6: ch 1, sc in next 10 sts; turn—10sts


Row 7: ch 1, sc decrease in first 2 sts, sc in next 6 sts, sc decrease in last 2 sts; turn—8sts

Rows 8-12: ch 1, sc in next 8 sts; turn—8sts

Row 13: ch 1, sc decrease in first 2 sts, sc in next 4 sts, sc decrease in last 2 sts; turn—6sts

Rows 14-18: ch 1, sc in next 6 sts; turn—6sts

Row 19: ch 1, sc decrease in first 2 sts, sc in next 2 sts, sc decrease in last 2 sts; turn—4sts

Rows 20-24: ch 1, sc in next 4 sts; turn—4sts

Finishing: sc around boarder of ear. Fasten off.


Tongue: red yarn (make 1) 

Use H Hook  

Row 1: Ch 4

Row 2: sc in 2nd ch from hook and in each ch after (3sc); turn—3sts total

Row 3-6: ch 1, sc next 3 sts; turn—3sts 

Row 7: ch 1, sc decrease in first 2 sts, sc in last stitch; turn—2sts

Row 8-10: ch 1, sc in next 2sts; turn—2sts

Finishing: sc around the boarder of tongue, 4 sc in each corner of end of tongue to give a more square look.  Fasten off.


Nose: black yarn (make 1) 

Use H Hook  

Row 1: Ch 9

Row 2: sc in 2nd ch from hook and in each ch after (8sc); turn--8sts total

Row 3: ch 1, sc decrease in first 2sts, sc in next 4sts, sc decrease in last 2 sts; turn -6sts

Row 4: ch 1, sc decrease in first 2sts, sc in next 2sts, sc decrease in last 2 sts; turn -4sts

Row 5: ch 1, sc decrease in first 2sts, sc decrease in last 2 sts; turn -2sts

Row 6: ch 1, sc decrease in 2 remaining sts; 1sts; Fasten off black.


Next Up: Putting It All Together

Friday, December 9, 2011

Gir Hat Pattern: Eyes

Previously

Eyeball: white yarn (make 2) 

Use I Hook

Round 1: magic ring, work 9 sc in ring; join with sl st in first sc—9 sc 

Round 2: Ch 3 (counts as dc now and throughout), dc in same sc as joining; *2 dc in next sc; repeat
from * around; join with sl st in 3rd ch of beginning ch-3—18 dc

Round 3: Ch 3, dc in same ch as joining, dc in next dc; *2 dc in next dc, dc in next dc; repeat from * around; join—27 dc

Rounds 4 and 5: Ch 3; *dc in next dc; repeat from * around; join.  Fasten off.

Top of Eye Round 5 Complete
Side of Eye Round 5 Complete
Pupil: black yarn (make 2)

Use H Hook  

Round 1: magic ring, work 9 sc in ring; join with sl st in first sc—9 sc. Fasten off, leave thread ends to sew onto eyeball.
Pupil Round 1 Complete
Eyes (pupils not yet attached)
Hat and Eyes complete but not yet attached

Thursday, December 8, 2011

Gir Hat Pattern: Earflaps

Previously
Getting Started
Hat Base

Earflap: green yarn (make 2)

Use I Hook

For the first earflap I did not detach the yarn from the base of the hat and just continued from the seam.  If you want the seam centered on the back of your hat you can detach the yarn and reattach for each earflap separately.  For the second earflap you must reattach the yarn at a different starting point. 

Ear flap 1: 

Row 1: Continue with attached yarn from previous round, ch2 (counts as first sc) sc in next 15sts turn;—16sts total

Row 2: NO CH dc decrease in first 2sts, dc in next 12sc, dc decrease in last 2sts; turn—14sts

Row 3: NO CH dc decrease in first 2sts, dc in next 10sts dc, decrease in last 2sts; turn—12sts

Row 4: ch 1, dc decrease in first 2sts dc in next 8sts dc decrease in last 2 sts; turn—10sts

Row 5: ch 1, dc decrease in first 2sts dc in next 6sts dc decrease in last 2 sts; turn—8sts

Row 6: ch 1, dc decrease in first 2sts dc in next 4sts dc decrease in last 2 sts; turn—6sts

Row 7: ch 1, dc decrease in first 2sts dc in next 2sts dc decrease in last 2 sts; turn—4sts

Row 8: ch 1, dc decrease in first 2sts dc decrease in last 2 sts; turn—2sts
Complete Earflap Outside (with black boarder)
Row 9: ch 1, dc decrease in 2 remaining sts; ch 51, turn sc in 2nd ch from hook and in each ch after (50sc); sl st in single dc at point of earflap.  Fasten off green.

Complete Earflap Inside (with black boarder
Earflap 2: 

Row 1: Join yarn in designated st (attach to 12th away from seam), ch2 (counts as first sc) sc in next 15sts turn; 16sts total.

Repeat Rows 2-9 on other side for other earflap.
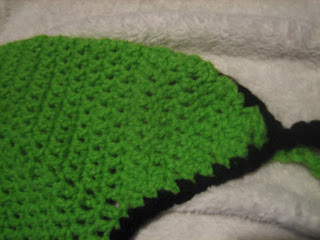
Back of hat (earflaps and boarder complete)
Boarder: Black Yarn 

Use I Hook

With black, join with sc at base of one of the earflaps.  sc into side of earflap until you reach the last dc (row 9); ch 51, turn sc in 2nd ch from hook and in each ch after (50sc)  sc in 2nd sc on earflap.  continue sc around entire hat, repeat process with 2nd earflap. 
 
Join with sl st to first st.  Finish off.  Weave in ends 

Black and green sc chains extending from earflap

Next up: Eyes

Wednesday, December 7, 2011

Gir Hat Pattern: Hat Base

Previously
Getting started

Hat Base: green yarn (make 1)

Use I Hook

Round 1: Start with magic ring, then 9 sc in ring; join with sl st in first sc—9 sts 

Round 2: Ch 3 (counts as first dc of round, used for entire pattern), dc in same sc as joining; *2 dc in next sc; repeat from * around; join with sl st in 3rd ch of beginning ch-3—18sts 


Round 2 Complete
Round 3: Ch 3, dc in same ch as joining, dc in next dc; *2 dc in next dc, dc in next dc; repeat from * around; join—27sts
Round 3 Complete
Round 4: Ch 3, dc in same ch as joining, dc in next 2 dc; *2 dc in next dc, dc in next 2 dc; repeat from * around; join—36sts
Round 4 Complete
Round 5: Ch 3, dc in same ch as joining, dc in next 3 dc; *2 dc in next dc, dc in next 3 dc; repeat from * around; join—45sts
Round 5 Complete
Round 6: Ch 3, dc in same ch as joining, dc in next 4 dc; *2 dc in next dc, dc in next 4 dc; repeat from * around; join—54sts
Round 6 Complete
Round 7: Ch 3, dc in same ch as joining, dc in next 5 dc; *2 dc in next dc, dc in next 4 dc; repeat from * around; join—63sts
 
Rounds 8-17: Ch 3; *dc in next dc; repeat from * around; join.  Do not fasten off. 

Round 17 Complete
Next Up: Earflaps

Tuesday, December 6, 2011

Gir Hat Pattern: Getting Started

The Original Gir Hat
This is the original hat that I created for my sister's birthday about a year ago.  Unfortunately I didn't write down the pattern as this was one of my first crochet projects.  Since then I have gotten numerous requests for the design specs of the Gir hat and I have been forced to explain that I honestly have no idea how I made the thing.  SO.... I have decided to make a second Gir hat,  and this time I will create a pattern to go along with it.


Gir Hat Take Two (aka. STOP!!! PATTERN TIME!!!!)

To get started You will Need:

Hook Size I (Used for: hat base, earflap, boarder, and eyeball)
Hook Size H (Used for: pupil, nose, ear, and tongue)
Need with Large eye for sewing in ends
Green, White, Black and Red yarn (used Red Heart SuperSaver)
Stuffing for eyes

Abbreviations:
sc=single crochet
dc=double crochet
sl st= slip stitch
sts= stitches (used for round totals)
sc decrease= insert hook through first stitch, draw yarn through, then insert hook through next stitch and draw yarn through, yarn over draw yarn through all 3 loops.
dc decrease= yarn over, insert hook through first stitch, draw yarn through, then insert hook through next stitch and draw yarn through (you should have 3 loops on hook); yarn over, draw yarn through 2 loops, yarn over draw yarn through final 3 loops.
for help with magic ring watch how to on youtube

Next up: Hat Base