Friday, December 30, 2011

Squirrel Resurrection

Three years ago my family discovered a dead squirrel in our basement.  It was unclear how the squirrel got in, or exactly how the squirrel died, but it was in good condition when we found it.  So I convinced my dad to help me bury the squirrel so  that I could get a complete squirrel skeleton.  We wrapped the body of the squirrel in the black mesh that you put down under gardens to prevent weed growth so that the little bones would not get lost.  Next we dug a small hole out behind the shed and put the make shift mesh bag in.  After covering the body with dirt, we covered the burial with a large paving stone.

Today I dug up that squirrel!

Can you feel the anticipation??
Although the squirrel was probably fully skeletonized two years ago, I had completely forgotten about it, and usually when I am home for winter break the ground it frozen so it would be very difficult to recover the squirrel.  This winter has been surprisingly mild, so I was actually able to dig up the squirrel and sit outside for several hours sorting the skeletal remains out of the mass of dirt that has accumulated in the mesh. 

Big reveal!!! ;)

Ooooo, teeny tiny squirrel bones
After sorting out the bones from the dirt clods and roots, I was left with a nearly complete squirrel skeleton.  I was even able to collect most of the phalanges and a good number of carpals and tarsals.  I will need to look for a squirrel reference book, since I am not familiar with how many carpals and tarsals a squirrel should have.  Also, I learned that squirrels only have four toes on their front paws, though they do have five on their hind paws.  I was wondering why I only recovered four sets of metacarpals even after extensive searching so it was exciting to discover that I had actually collected them all.

Fingers and toes!!!
Ribs and verts

Box-o-squirrel
One interesting thing about this particular squirrel is that it was not fully grown.  I can determine this by looking at the epiphyseal fusion.  Epiphyses are the ends of the bones and form separately from the diaphysis or shaft of the element.  The epiphyses form via secondary ossification centers that are disconnected from the shaft.  As an individual grows, the shaft undergoes longitudinal growth (increase in length) reducing the space between the shaft and ends.  Eventually the portions meet along the metaphysis or growth plate and fusion occurs.  When the diaphysis and epiphysis initially come together a line can be seem at the point of union.  Over time this line is obliterated and it is impossible to see where the portions joined.  In this case, the distal femur (top of knee joint), proximal tibia (bottom of knee) and proximal humerus (at shoulder) are all unfused.  Furthermore, the fusion lines are still visible on the distal radius and ulna (wrist). 

After a little more cleaning, and research into squirrel skeletal development I will hopefully have a better idea of what happened to this little guy.  :)

Wednesday, December 28, 2011

Skel-art-ons

This is one of the coolest feats in textile creation that I have ever seen.  Yes, an anatomically correct knitted human skeleton!  First of all, WOW.  The detail of the skeleton is incredible.  I am impressed with the amount of knitting as well as the accuracy of the skeleton.  I have no idea how to knit, but I can crochet and thinking about the size and number of stitches that went into the skeleton project is overwhelming.  On top of that, the design and construction of each element, from the long bones to the skull to each individual tarsal, carpal and phalanx is very accurate, especially given that the medium use is yarn. 

It really is astounding.  I have a strong desire to create a similar project in crochet.  I realize it would be insane and that I don't really have the necessary free time to devote to such an endeavor, but maybe I can make separate bones over time and eventually form a skeleton.  It could be fun to create patterns for all the skeletal elements of the body. 

Skull embedded in wall (Capela dos Ossos)
After discovering a skeleton formed completely from yarn, I decided to look for other artists who created pieces inspired by the human skeleton.  Here are a couple that I was impressed with.

I like this piece by Monaux because the skull is embedded in the outline for the design.  It reminds me of the optical illusion designs like "All is Vanity" by C. Allan Gilbert (pictured below).

"All is Vanity"
While it is extremely unlikely that I would ever decide to get a tattoo, I have to admit that this invisible UV skeleton arm tattoo would be glorious.

I am also impressed with this sculpy model of a human skeleton.  The skeleton is beautiful and anatomically correct.  The musculature is also very detailed and looks correct, although I don't know as much about soft tissues.  Maybe after gross anatomy next semester I will be able to better appreciate the entire model.  I can't wait.  :)

Tuesday, December 27, 2011

Stencils, Spray paint, and the Challenges of Large Sticky Surfaces

So far I have only transformed one of my designs into a spray paint stencil.  But it actually isn't too difficult.

First you have to choose a design and decide how large you want the stencil to be.  Since I only had access to a regular printer I designed my stencil to be divided into printer paper size sections (8."5x11").  This way I could enlarge the image, print it on multiple pages, and then tape all the pages together for the final stencil.  For this stencil I divided the image into six panels, then I taped them together along the seems.  I then covered the entire stencil with clear contact paper to make the stencil stronger so that it wouldn't rip when it was painted.  The total size of this stencil came out to be 17"x33".


When making the stencil, you need to consider how many different colors you want to use.  For each color you will need to cut a different stencil layer, except for the background which can be sprayed on as a solid coat over the entire canvas.  For this particular stencil, I cut two stencil layers, one for the white and one for the black.  To cut out the stencils I used an exacto knife to get clean edges and remove complex shapes.  For the white stencil, I cut out the basic outline of the entire girl.  So it was just a silhouette without any of the internal detail.  For the black stencil, I cut out all the black areas but left the white areas uncut.  One thing that you must take into account when creating the initial stencil is that you cannot have any white areas that are completely surrounded by black areas, otherwise the entire area will be cut out and be painted black when you spray the stencil.

Print of black layer only
Another thing you should be aware of when buying spray paint is that you must be over 18.  While I am old enough to legally buy spray paint, every time I get more I end up getting carded.  I tried both Krylon and Rustolium paint, and so far I like the Rustolium spray paint a lot better.  The Krylon paint is extremely watery and has a much greater tendency to run everywhere.  This might be due to my poor spray painting technique, but I have had better luck with the Rustolium.  These are both fairly cheap spray paint brands, but they are nice because they can be found at a local hardware store or Walmart.  I am new to spray painting, so I have not yet looked into better quality paints.

To create the final piece I first sprayed the entire canvas with red paint.  I tried to do this evenly, not holding the spray paint too close to the canvas, but it was tricky since I was spray painting outside and the wind would catch the paint if I was too far away from the canvas (this was a problem because my housemate warned me that if I accidentally got paint on his house I would be in trouble :P).

Also, be sure to lay down paper or plastic under the canvas because grass and little bits of debris can become stuck to the wet spray paint.  Once you paint the canvas bring it inside immediately so that it can dry.  Although the paint dried fairly quickly on the brown paper, it dries much slower on the canvas.  For my first print I attempted to spray the three stencils leaving only ten minutes drying time.  This did not work out very well and I ended up pulling up some of the previously sprayed areas when I tried to remove the stencil.  For my second attempt I let the paint dry for about a day in between layers and I didn't have problem with the stencils sticking or damaging the previously painted layers.

Since the canvas is 24"x36" the stencil did not cover the entire canvas.  The problem with this is that the overspray would get on any uncovered area.  Spray paint goes EVERYWHERE!!!  To fix this be sure to cover all area of canvas that you do not when colored. 


One thing that I like about the spray painted version of my designs is that they never come out exactly the same.  For example, the stencils don't line up exactly the same or I over spray too much black or white in different areas creating a unique look even though I'm using the same stencil.  Although I do like the clean lines and boarders generated in photoshop, there is something nice about the imperfections as well.

Saturday, December 24, 2011

'Twas the night before Christmas

'Twas the night before Christmas, when all through the house
not a creature was stirring, not even a mouse.
The stockings were hung by the chimney with care,
in hopes that St. Nicholas soon would be there.

T-rex Christmas Card :)

But I heard him exclaim, 'ere he drove out of sight,
 

"Happy Christmas to all, and to all a good night!"

Friday, December 23, 2011

Malachim: Macabre and Majestic Messengers

With Christmas fast approaching I have been seeing holiday angels everywhere.  Now don't get me wrong, those angels are great, but it got me thinking about the insufficient representation of angels of death or even warrior angels.  Anyway, I decided to design a few angels of my own.

The first angel is more of a grim reaper.  She is carrying a large scythe and there is a human skull lying in the darkness ahead of her.  The second angel is a bit less macabre, even though she is also depicted without color.  Her hand is cupping a rose blossom, but the petals are still being blown away by the wind.


I created these designs in photoshop and I think they would make a cool stencils.  Sure, it would be a pain in the neck to cut out, but it would be awesome as a full size mural.  I would need to modify some parts of the designs so that I don't have any white areas completely encased in black, otherwise the entire piece would be removed when I cut out the black part.  I would also have to make them quite large since the designs are complex, and if they are too small it would be very difficult to cut out the detail in the wings and folds of the dresses.  Furthermore, when I started spray painting it all the little tiny points would curl up, and it would be impossible to get them to sit flat against the canvas.

That begin said, I would love to see them together in a mural of sorts.  Though looking at the combined design I think possibly there should be a third panel.


Also, while I was working on the project my sister started playing the song "We are Young" by Fun constantly, and I have had it stuck in my head throughout the angel making process.  Now whenever I look at the designs, the song starts playing in my head.

Thursday, December 22, 2011

Christmas Mold Fail

In order to understand the following e-mail, you should probably be aware that I am a pack rat and I have a high tolerance for clutter.  My housemate, X*, does not.  X* is one of the most organized and and ridiculously intense cleaners I have ever met.  My second housemate, Y*, is tidy as well, though not quite as intense as X*.  Anyway, yesterday I received this e-mail from my housemate.  I realize that my intense, fridge cleaning housemate has a point, and justifiably it would not be fun to be the one cleaning out the fridge, but this e-mail was hilarious.  I had to stop reading several times because I was laughing so hard. 

*names have been changed to letters to protect the identities of the two offending housemates ;)

-----------------------
Last night I took advantage of both of you leaving for the holidays and performed the fridge's yearly cleaning, and I have to say that you two are disgusting and I cannot believe I share a fridge with either of you.  Y*, the food you told me I could eat if it looked like it would go bad before you returned had all already gone bad.  Those were Thanksgiving leftovers!  Z*, I understand why you would not want to finish those prepackaged hard boiled eggs after trying a couple, but why would you leave the still open package in your drawer and how long ago was that?!  These are just a couple of examples of the many repugnant odors and colorful molds I discovered last night.  Also, last year I kept items with long shelf lives, e.g. anything vinegar based, even if they were a few months past their expiration date, but this year, rather than wonder if any of these items were still good one year and a few months past their expiration date, I just threw them out because they obviously are not being eaten.  This includes the salad dressing, which has been in the fridge since before Z* moved in, that X* wanted to keep incase he ever started eating salad, and a jar of pickles in the back of Z's* shelf that expired in June which she must have brought with her when she moved in because all my pickled food, which I bought this year, isn't dated to expire until 2014.  Both of your shelves are nearly empty now because you both had more spoiled food then edible food on them.  So like I said, you two are disgusting, my nose is scarred, and I want my own fridge.  Merry Christmas.

X*
-----------------------

Since I do not have any pictures of the fridge cleaning incident, I decided instead to share another interesting micro organism story.  Can you identify the shape of the bacterial colonies in this picture?  Here's a hint, the cut off words say "kiss plate."


Yes, all those little white blobs are bacteria that came from my lips and the tip of my nose.  A little creepy.  The bacteria are growing in a gel medium that was placed in an incubator for several days so that the colonies could flourish.  This experiment was for a biology 101 lab looking at micro organisms and antibiotics.  It is frightening to think about all the micro organisms surrounding us everyday, but luckily most are harmless pass us by completely unnoticed.

Hopefully X* won't be too mad by the time we all get back from our holiday traveling.  I will have to get him a nice gift, something without any multi-colored mold.

Tuesday, December 20, 2011

Paper Platypus and Other Adorable Origami

Every year the American Museum of Natural History decorates a giant tree with origami based around a specific theme.  This origami tree is covered with a wide array of different animals both living and extinct ranging from dinosaurs to lions and tigers and llamas. 

Origami Tree Natural History Museum 2009
Yes, that is an origami platypus!!!
It is amazing to see how many different shapes can be created from folding a single square piece of paper.  Just about any imaginable animal can be formed through a complex series of folds.

Here is my attempt at holiday origami.  The fox is my favorite.  If you want to create your own fox, a tutorial can be found here.  


If you are looking for holiday gift ideas, this origami crane ornament is adorable and can be hung on the tree for the holidays or displayed year round as cute glass decoration.  I don't remember where the clear glass balls came from, but I'm sure they can be bought at craft stores.  The cranes were made out of small squares that I cute from wrapping paper.  Aside from that, you need a tiny piece of thread and any medium size bead and you can make your very own ornament.

Crane in a bubble
To make the ornament I folded tiny origami cranes that would fit inside the glass balls.  The cranes need to be small so that they can fit through the opening in the ball.  To attach the crane to the ornament I used a needle to sew the thread through the top of the body of the crane.  I then feed the sting through the opening in the bottom of the body of the crane and strung the bead on the string.  Next I threaded the needle back through the body of the crane and tied the sting so that the crane would remain seated on top of the bead.  After that, I inserted the bird and the bead into the glass ball.  In some cases I had to squish the crane a little to fit it in.  I kept the wings folded next to the body of the crane till it was inside the ball.  Then I pulled up on the sting so that the wings would spread out as they were pushed against the top of the glass ball.


Once the crane was inside the ball I took the opposite end to the sting and I wound the string through the silver attachment on the glass ball.  When the crane was hanging in the correct place in the ball I clipped the silver top back in place.  Since the silver attachment is above the desired location until it clips into place you must be sure to take this into account when placing the crane.

Have fun folding!

Monday, December 19, 2011

You've got a Lizard in your Ear

The mammalian skull offers a unique opportunity to discuss evolutionary adaptation and and the difference between homologous and analogous features.  When examining the fossil record, the separation of modern "mammals" is demarcated by a change in joint connecting the mandible to the skull.  Prior to this point the connection was formed by two separate bones, the quadrate and the articular.  In birds and lizards and other non-mammalian genera these bone are separate from the body of the mandible and the cranium.  In mammals, the mandible articulates directly with the temporal bone of the cranium, without any intermediary bones.

Meow?
So, are the quadrate and articticular bones present in mammalian skulls?  In fact these bones are conserved, but they serve a different function in the mammalian skull.  Homologous features are the same physical structure between different taxa.  While the features are morphologically the same, they may preform different functions in different organisms.  On the other hand, analogous features have the same functional uses, but arise from different anatomical structures.  In mammals, the incus and the maleus bones of the ear are homologous to the quadrate and articular, respectively.  Although the bones are the same anatomical structure, in mammals, the bones preform a major role in hearing rather than jaw movement.  Instead, the articulation between the temporal and the mandible is analogous to the quadrate/ articular connection in non-mammals, since it has taken on the functional job of connecting the mandible to the cranium.


Transitional fossils have been found showing organisms with a jaw articulation between the temporal and mandible as well as the quadrate and articular.  The change in the jaw articulation is likely due to several different factors.  First of all, reduction in size of the articular and quadrate made them more sensitive to vibrations and improved the hearing capabilities of these organisms.  Organisms with better hearing were better able to avoid predators and reproduce.  Thus, the continued reduction of the ear bones was adaptively advantageous.  Alternatively, the reduction of the jaw joint limited the size of the jaw and the bite strength of the organism.  In this case, a larger joint was more advantageous because it allowed the organism to consume larger prey and also subdue the prey more efficiently.  Thus, decoupling these two functions, allowed mammals to benefit from both increased hearing and jaw size.

Be Aware, It's a Bear!!!
If life ever gets you down, just remember, you have a tiny little lizard jaw joint working in your ear. :)

Sunday, December 18, 2011

Tatted "Tooth Fairy" Masks

One holiday project that I have been working on is a series of tatted masks.  The white one is completed, the red one needs a little more embellishment, and the eyes on the black one are not finished yet.


Originally I had planned to display the three in a shadow box with the title "Disguises of the Tooth Fairy" as a gift for my dad (he's a dentist :)), but it got a little crushed on the plane ride home.  I will have to see if I can find a new piece of glass at the craft store tomorrow.  Aside from being crushed, I think the combination of the masks makes a cool piece of artwork.  While I can make tatted and crocheted things for my mom and sister to wear, it is a little harder to come up with things for my dad.  But I figure he could display it as an art piece at his office or somewhere at home.

Tooth Fairy Fashion
My dad is very patient and able to do extremely detailed counted cross stitch, so hopefully he will think the intricate lace and beaded details are neat.  For the white and black masks I used the pattern provided by Totusmel on Instructables.  She also has many amazing tatting patterns on her blog, along with tutorials how to tat using a needle.  Here is one of her designs that I replicated because I thought it was amazing.  I was impressed with the way she alternated the three different colors to create a bracelet of interwoven rings.

Infinity in shades of lavender
Eventually I hope that I will be able to design my own tatted patterns, but right now I am pretty good at recreating designs that I see.  I have begun tatting a different mask out of several motif designs, so it will be interesting to see how it comes out.

Saturday, December 17, 2011

Ties That Bind

There would I find a settled rest,
while others go and come;
no more a stranger or a guest,
but like a child at home.

-Psalm 23, para. Isaac Watts (1674-1748)

Is it strange  that someone with almost no religious training has several biblical passages memorized?  Maybe not, since many of the old songs and musical arrangements that we learned in chamber choir were based on religious texts or ideas. This particular excerpt is from the end of an arrangement that we sang my senior year of high school.  While I don't recall most of the song, this part of the piece always stuck out as memorable.  Rather than any sort of divine, otherworldly experience, heaven is expressed in warmth and comfort of coming home.  The sense of truly belonging somewhere, seen through the innocent, unjaded eyes of a child.  As depictions of heaven go, this is definitely one of my favorites.

Even though I am a "grown up" now, I still love the thought of going home and being surrounded by my family.  I miss my parents and siblings and I am excited to be flying home for the holidays.  Most places you visit, you usually the need to be on your best behavior, to be entertaining and engaging.  But home is a place where you can just be.  Family sees you at your best and your worst and they still love you.  You don't always agree on things or even like each other, but the bonds of family endure.

DNA.  Deoxyribonucleic acid.  Lots of time little nucleic acids bonded together into a double stranded helical pattern.  Replicating over and over to produce the blueprint for each structure in the body.  It is almost incomprehensible to think that humans share 99.5% of their DNA with chimpanzees, and yet each human has a unique DNA profile that can be distinguished from all other humans.  DNA is both individualizing and encompassing, as is separates (distinguishes) the individual human from their contemporaries while simultaneously connecting humans to all other living organisms on earth.  In this image, a little girl returns home with the skeletal remains of her sister.  Unbreakable invisible bonds of DNA link the girl to what is left of her sister's bones, even though the recognizable features of flesh have been obliterated by decomposition.


DNA offers a powerful tool for identifying individuals and identifying those who we are closest to genetically.  In this case, the little girl is reunited with the remains of her relative combining the shared experiences and memories of family members with the shared genetic inheritance.  In this way, the siblings are able to return home together.


No more a stranger or a guest.

Friday, December 16, 2011

Granny's Garden Permutation

I just completed the blue series for the granny square blanket I have been working on.  I'm not sure if you can tell from the picture, but so far no color sequence has been repeated for this blanket.  I have three shades for each color, as well as black and white.  So for each set I am using a combination of black and white with two of the color shades.  Following that pattern I can make 24 different square permutations for each set of four colors, given I don't ever repeat a color sequence.  I had already made three sets of 24 squares using the purple shades, but now I have also completed three sets of blue squares.  I have one completed set of 24 green squares, so my next task is to crochet the remaining two series of 24 square.  Stitching some simple statistics into my project keeps me entertained and I really like that none of the squares have been duplicated so far.  Each one is unique, even though it shares the same color scheme and underlying pattern as the rest of the squares. 

Once I finish all three sets of 24 for each of the three colors I will have a total of 216 granny squares.  I can't wait to finish the green and see all of them laid out together!

168 Lovely Little Grannies :)
I haven't decided how I want to lay out the blanket after I finish making up the squares.  I don't know if they will look best grouped by the outer bordering color or if I should block them in sets of 24, or even mix and match color combinations.  I am also considering making a much larger blanket and doubling all three color sets.  That would mean the total number of squares in the blanket would be 432.  I wonder how many stitches that would be. 

If I double the entire series of squares, then each square would have a single matching counterpart.  Kind of like a giant game of memory. 

Granny Square Garden
I am really happy with the color combinations.  They are all so pretty, and the different shades all seem to go really well together.  The pattern I'm using for the actual square can be found on Attic 24's blog.  She does some beautiful crochet work and offers many different patterns with helpful tutorials, so if you are learning how to crochet you should definitely check out her blog.

Thursday, December 15, 2011

Firefly Jars

One thing that I miss about the summer months is seeming fireflies light up the early evening hours.  Tiny beacons against the darkening night sky that make you want to smile.  So when I came across a tutorial on how to make firefly jars, I was hooked.  I gathered up some old glad jars (the one on the left used to hold pickles and the one on the right was originally contained tomato sauce, yum), a paint brush and a few bottles of different colored glow-in-the-dark paint.  In a few minutes I was able to whip up my own illuminated bottles.  I was expecting the paint to really glow when I turned out the lights (based on the pic in the tutorial), but I was disappointed that the dots I painted were almost invisible in the dark.  After that I abandoned firefly jar project, and just used them to hold random stuff around my house. 

So pretty!
But two months later I was hunting through the clearance Halloween goodies and discovered a miniature black light.  Once back home I began investigating the new and exciting world of UV radiation and what should I happen to notice, but the firefly jars!!!  Apparently, the UV wavelength caused the pigment in the glow in the dark paint to illuminate.  So there you have it, firefly jar awesomeness.  :)

My mission to add a little firefly cheer to the winter continues with another design project I have started.  Here is a rough sketch of some fireflies. 


I think a series of lanterns filled with illuminated insects would be fun.  If I make it as a stencil then I could even use the glow-in-the-dark paint to add a second dimension that would only be visible with the black light.  Maybe even a secret coded glowing firefly message. 

Wednesday, December 14, 2011

Donatin' the Bloods

Today I stopped by Medic because I was pretty sure that I was able to donate again.  It turns out today is exactly two months since my last donation so I was able to give blood.  :) 

When I first started giving blood I used to freak out before going because I'm a chicken when it comes to needles.  I think donating is starting to desensitize me because I don't panic before they are about to stick me anymore.  I still don't like needles, but I'm not afraid of them.  Hooray for conquering fears!

Pumping out a pint

Awesome bright orange bandage!!

Every time I donate blood, punnett squares pop into my head.  I can't help it, I'm a nerd.  My blood type is A+ (either AA+ or AO+), so assuming that my parents are actually my parents that means they must be either A and A or A and O, and if they are A, they could either be AO or AA, since A masks the expression of O.  Also, one or both of them must have be positive for the Rh factor, since that is also the dominant allele in this situation, and I am +.  Furthermore, my siblings must be A or O, though they could be either + or - since - is recessive and either of my parents could be heterozygous (1 positive and 1 negative allele) for the Rh factor gene.  These results are not surprising since O+ is the most common blood type in the US, followed by A+.

Hopefully my blood will help someone in the future.   You never really know when you might find yourself in a situation where you need a transfusion, so it's cool that we can rely on the help of complete strangers for something so essential as blood.

Tuesday, December 13, 2011

Ipharadisi

Ipharadisi, ikhaya labafile
Kulapho sophumla khona, Ipharadisi

Ipharadisi, ikhaya labafile
where all the dead are living
May we one day join them all there, Ipharadisi


The song above is one that I learned during my time in high school chamber choir.  I don't remember the origin or if there was a specific author, but I always found the song comforting.  I suppose Ipharadisi represents some sort of heaven or ghost realm, though an actual translation isn't included in the song.

The image is one that I created in response to a class I took about genocide.  In the aftermath of genocide, a child sifts through human remains in hopes of recognizing family.  For me this idea is both deeply disturbing and surprisingly hopeful.  Reuniting the living and the dead offers a chance for closure, but it also forces the living to accept the reality of loss.  Following mass killings, the remaining community is forced to decide how to engage with the dead.  Although the dead are not recognized as having rights postmortem, the attached meaning and dignity of human life prevents them from ever really being just objects.  Can the living truly understand or come to terms with the dead or death while they are alive?

Monday, December 12, 2011

Darwin Day Submission

Man is descended from a hairy, tailed quadruped, probably arboreal in its habits.
~Charles Darwin

After much prodding, I transformed my human evolution design into a piece that I could submit for the Darwin Day T-shirt competition.  Here is the final design I decided to submit.


As you can see, the design is centered around my original human evolutionary tree concept, but I added the text and the outlines of extant primates.  The three additional taxa of primates include Pan (lower left), Gorilla (lower right), and Pongo (upper left), since these genera are mostly closely related to Homo out of the primates living today.  I decided to remove the arm with the apple because I didn't think a disembodied arm would work well on a t-shirt, without an edge to line up with.  
 
Instead I added a finch perched on the girl's outstretched hand.  If you are familiar with Darwin you will recognize the finch as a one of the species of Darwin's finches that had developed a large wide beak in order to specialize on tougher food sources that finches with long narrow beaks could not easily consume.  Finches with narrow beaks specialized in feeding on different resources, allowing the different morphs to exploit different niches rather than directly competing for the same limited resources.  Over time, initial variation in beak dimensions was enhanced, since different shapes provided different advantages allowing some birds to access resources that the others could not.  Thus they didn't starve and were able to reproduce and pass their genes onto the next generation.  Anyway, I digress, basically the finch is an homage to Darwin as well a representation of a possible mechanism of change.
 
I wasn't sure if I should draw the lettering or use a font.  Also, I realized that since Darwin Day isn't until February the actual year would be 2012 (oops) so I fixed that in my final design.  Here are the original design layouts with the girl, the text, the arm and the bird.
 

Originally, I had just thought I would use my design with the girl and text on a red background, but the t-shirt had to be white so that limited the background color.  Since I didn't want to just put the girl in a square of color I tried to add color to surround the outline in by containing it in the shapes of the other primates.  I didn't like the first design because I didn't think the ape was distinct enough, so I removed that image and changed to the large ape on the right of the girl.  I then added the small ape on the left bottom and finally re-added the one at the top left.  I was trying to use the apes to make the girl stand out more so I had a difficult time laying them out to minimize the area of the girl bordered by white while simultaneously positioning them to look like they looked like they belonged in the image.  Amusingly, all of the background primates are based on pictures of chimps, but by manipulating the size and design of the images they definitely look like different apes.  Finally, I changed the color to orange to fit with the Tennessee theme.


I mostly like the way the design came out.  The lettering is a little strange because it crosses the orange and white backgrounds, but I tried multiple different text layouts and I couldn't find any that I like better.  I really like the addition of the extant primates because it adds context to the evolutionary tree depicted in the girl.  It would be cool to include similar evolutionary lineages in the other primates, but unfortunately I am not very familiar with the evolutionary records of other primates and I know for chimpanzees few fossils have been recovered.
 
The judging of the designs doesn't happen until January, so I guess there won't be any updates till then.  Hope you like the design, and think it would make a neat t-shirt. :)

Sunday, December 11, 2011

Gir Hat Pattern: Putting It All Together

Previous
Getting Started
Hat Base
Earflaps
Eyes
Ears, Tongue and Nose 

You have finished crocheting the Gir Hat Pattern, congratulations!

All that is left is to assemble the hat. 

Zipper Seam.

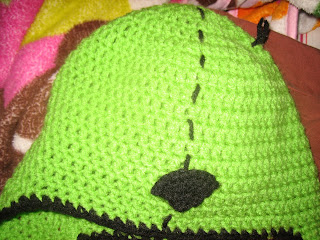
At the middle of the front of the hat (count in to stitch 12) attach black yarn.  Weave the yarn over and under alternating rows of dc in a straight line up the center of the hat, cross over the peak of the hat (the magic ring/ starting point) and continue down the back of the hat till you reach the boarder of the opposite side.  Do not pull this thread too tightly or is will cause the hat to pucker.  Tie of the yarn and weave the ends into the boarder. 

Front view of zipper seam


Top view of zipper seam

Back view of zipper seam

Attach Nose to Hat Base.

Attach the nose along the black seam in the middle of the front of the hat.  The nose should be centered along the seam with the bottom point lined up with the top of round 16 on the hat base.  Stitch around the boarder of the nose with black yarn so that is blends in.  Tie off the yarn and weave in ends. 

Front view Nose Attached

Attach Tongue to Hat Base.

Place the small end of the tongue (row 10) along the inside of the boarder of the hat base near the corner where it meets the earflap on the front of the hat (the front has a wider distance between the earflaps).  Sew the tongue to the hat with black yarn.  Tie of the yarn at either ends and weave into the boarder. 

Front of hat with tongue

Tongue attached

Attach Ears to Hat Base.

Attach the ears to the hat along the shortest boarder of the ear (row 24).  Position ears on back of hat so that they are located equal distances from the "zipper seam" and appear to be symmetrical.  While they can be placed anywhere you want, I placed mine so that the top of the row 24 was attached between rounds 4 and 5 on the hat base about 6 dc away from the seam.  Then the ear was stitched on at an angle so that the bottom of the ear attachment was located between rows 6 and 7 and over about 8 dc from the mid line seam.  Tie of yarn and weave in ends.  Repeat for second ear. 

Back of hat ear placement

Attach Pupil to Eyeball.

Center the pupil on the eyeball and thread the ends of the left over yarn from the pupil through the spaces between the 1st and 2nd rounds on the eyeball.  Continue to stitch all the way around the pupil till you get back to where you started.  Tie of the yarn and weave in the ends.  Repeat for second eye.

Stitching on pupil, view inside eyeball

Stitching on pupil

Attach Eyes to Hat Base

Stuff eye ball with enough fiberfill that it remains round when poked, but not so much that it is overflowing.  Attach eyes so that they are placed symmetrically on either side of the zipper seam.
I placed the eyeballs so the top of the eyeball was along the bottom of round 5 and the bottom extended down to the top of round 12.  Stitch around the base of the eyeball with white yarn.  Tie off yarn and weave ends into base of eyeball.  Repeat for second eye.

Stitching on 1st eye

Eye placement

Adding the second eye

Both eyes attached

Hoorary!!! Your Gir Hat is FINISHED!!!!


As you can see, I changed the ears a little from the original hat, but everything else is as similar as possible.  I hope you have fun making gir and if you notice any mistakes in the pattern please let me know and I will fix them.  Also, I have compiled all the previous instructions into a single PDF.  I am not entirely sure how to upload it onto blogger, but if you want it I would be happy to e-mail it to you.

Good luck and happy hooking. :)